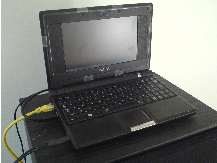

I bought an Asus Eee-PC 701 4G in spring 2008 but I realised after some time it was too small to not be used ”painfully”, at least compared to my MacBook. Since noone is interested of buying that computer I wanted to create a media server of it. The disk space inside is only 4 gigabytes as well as the SD card, i.e. totally 8 gigabytes. However, that’s not enough if you want to store music and films. So I bought a Western Digital Extern HDD My Passport Essential 500GB since it is small, quiet and does not require an external power source (it is USB-powered). The downside is that it is a bit more expensive that those larger in dimension.
As base system I first went for Ubuntu Server since I am familiar with Ubuntu and I know how to set up most needed software. But after a failure behind the steering wheel, I did a reinstallation and this time I used Ubuntu Desktop 9.10. I later updated it to 10.04 LTS.
Following the steps below will do mainly this:
You don’t have to follow this guide from beginning til the end. Of course you’ll need the base system, but additional functionality can be added at any time when you get the need for it.
Download and install Ubuntu 9.10 using UNetBootin to an USB memory stick. Since I have an SD-card I went for this configuration:
ext4 (3480 Mb), mounted as /
swap (518 Mb)
ext4 (1999 Mb), mounted as /var
swap (2023 Mb) (I don’t know for what I will use this now)
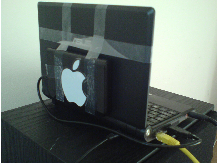
I first had the external disk attached and it was supposed to be mouted automatically. However, it did not work as expected so I recommend to add it manually afterwards (add in fstab as /media/Titan). The way I mounted it physically is shown in figure 1.


For some reason is the sound level muted on reboot, hence it is necessary to start Gnome, unmute and then play music. So the steps below may not be recommended at this moment.
gdm is the graphical login screen when Gnome starts. To disable (if you like), edit the following lines in
/etc/init/gdm.conf:
start on (runlevel to start on (runlevel [3]
stop on runlevel [016] to stop on runlevel [0126]
To start X after login, run startx.
Test if sound does work with:
In this case it is not and may be solved by adding the user to the same group as those listed in /dev/snd/, probably audio. Fix with
then logout and relogin. You should now be able to set volume with alsamixer.
Install the SSH server with:
If you do not want to be logged out automatically after inactivity, add the following to /etc/ssh/sshd_config:
Based on guide at https://help.ubuntu.com/8.10/serverguide/C/openssh-server.html. Generate the keys on remote machine (not server), from a terminal prompt enter:
This will generate the keys using a DSA authentication identity of the user. During the process you will be prompted for a password. Simply hit Enter when prompted to create the key.
By default the public key is saved in the file ~/.ssh/id_dsa.pub, while ~/.ssh/id_dsa is the private key. Now copy the id_dsa.pub file to the remote host and appended it to ~/.ssh/authorized_key:
Finally, double check the permissions on the authorized_key file, only the authenticated user should have read and write permissions.
Uncomment line in /etc/ssh/sshd_config:
To disable login without this key, also change to this:
It will now not be possible to login with a password as before, but only with these keys. Don’t forget to restart the SSH server:
If you have X installed you can run it from another computer (similar to VNC) using
Based on http://ubuntuforums.org/showthread.php?t=249889, this will install an NFS server which gives better transfer speeds than mounting as SSH. Since NFS uses the user ID as identification it should be the same on all machines accessing. This will not be the case if you use Mac since the first UID is 501, and on Ubuntu it is 1000. The NFS server unfs3 is said to be able to handle this, but I could only get read access. If that’s enough, the info is given below. But first the standard way.
Two options exist; either change the UID on one of the machines so they are the same (see usermod for more info), or use anonuid=1000,anongid=1000 in the options of the share in the export file (may be a security risk). Install NFS server:
Add share to /etc/exports:
Update the file with sudo exportfs -a and then restart the server using sudo /etc/init.d/nfs-kernel-server restart.
In this case I’ll use unfs3 since it can handle mappings of user id’s, good if your user on local machine has different UID than that on the server. Install with:
Add share to /etc/exports:
Use id username to see username’s UID and GID. Then set up file /etc/nfs/hikari.map with mappings:
Restart server:
Install Music On Console Player:
To start the player (including the server), run mocp.
This program plays the sound locally, i.e. through the speakers of the Eee PC or connect it to an amplifier. It plays FLAC, MP3, OGG and Wave. Information on how to convert AAC to playable format, read 8.4.
Enable “remote access” in OneSwarm, see section 7.2.
Due to hardware limitations this may not work flawlessly.
Install VLC, FFMPEG and some codecs using
On server terminal, write
On client machine (IP: 192.168.1.2), start VLC check the SAP announcements setting. Name ”Video” will show up, click to start playing. However, it is streamed and pausing is not possible.
A small and text-based torrent software is rTorrent. Install by
User guide found at http://libtorrent.rakshasa.no/wiki/RTorrentUserGuide. When logged in to the server by SSH it is very convenient to use the program screen. It is then possible to initiate an rtorrent session, then log off (or perform other tasks) and let it continue. The command to use is
Hiding the “screen” is done by Ctrl+a+d. You may now disconnect the SSH session and resume it another time from any other computer. To resume the screen again, use
Download OneSwarm, current version is 0.6, from http://oneswarm.cs.washington.edu/. It requires Java and a browser, for example:
It is possible to use the X virtual frame buffer which doesn’t need to run X.org. The downside is that you can currently not add swarms manually (only automatically). But if you’ve set up remote access you can as always access your swarms. To install the X virtual frame buffer, run
It is then possible to run OneSwarm from the terminal using
Using Xvbf saves resources compared to using normal X. But if you need to manually add files, stop OneSwarm, start normal X with startx, open Firefox and then add files. Hopefully OneSwarm developers will implement functionality for adding files remotely soon.
Following the steps below, the suspend and resume of the Eee 701 is done in a few seconds.
In the power management settings (menu: System / Preferences / Power Management) you can set the computer goes to sleep (suspend) whenever the power-button is pressed. The default is to ask the user.
When you turn the computer back on, it will by default ask for password. It can be disabled by using gconf-editor. Run it from the terminal or using Alt+F2. Browse to /apps/gnome-power-manager/lock. Set (disable) the following:
Source: http://superuser.com/questions/71465/how-to-disable-screen-locking-after-sleep-on-ubuntu-9-10
Turn the backlight of the LCD on or off (NB: it will not turn on automatically by keyboard or mouse use!!):
Make files written to /tmp only be in RAM instead, hence these will be lost when computer shutdowns or reboots. Add this line to /etc/fstab:
Reduce disk writes by putting the /var/log directory into RAM, and save it to disk only on halt or reboot, and eventually every n:th hour or so.
Add this line to /etc/fstab:
Create the Upstart jobs logsave and logload, save to /etc/event.d/. logsave reads:
And logload reads:
Eventually add command /sbin/initctl emit logsave to crontab (see section 8.5 for information).
Reduce what is logged by editing /etc/syslog.conf.
Current version of Ubuntu (9.04) will give a warning on login if the disk is almost full. If you use another version or want to set a special level for when the /var/log memory is “full”, put these lines in /etc/bash.bashrc which is run every time you log in:
Following based on information from http://gimpel.gi.funpic.de/wiki/index.php?title=Howto:convert_aac/mp4_to_wav/mp3/ogg_on_Linux.
Install faad (read AAC-files) and lame (MP3-converter) with the following command:
Now convert files with
To convert many files at once, use this script:
The external disk is also used as backup of important files. Backups should according to Linux Standard Base (LSB) be stored at /mnt/backup. Therefore I made a soft link to the external disk. The following script is based on script found at https://help.ubuntu.com/8.10/serverguide/C/backup-shellscripts.html and is run once a day (in my case below at 23:45). Put
in the crontab file (edit it by running sudo crontab -e). The script, sysbackup.sh follows below and the filename of the backup file will contain the name of the day, hence only the last 7 days will be stored.
Make a list of all programs (incl. libraries) to a file on the external drive1 . In case of a reinstallation, it is easy to reinstall all programs automatically. The following script creates filenames in same manner as in sec 8.5. Save this script somewhere, for example as /usr/local/bin/listinstalled.sh, and make it run every now and then using crontab (see above).
To recover, run this as administrator:
press “i” to install.
Bandwidth monitor
Music Tag Editor for console.
Welcome message to show when logging in from terminal.